
 Save Pin
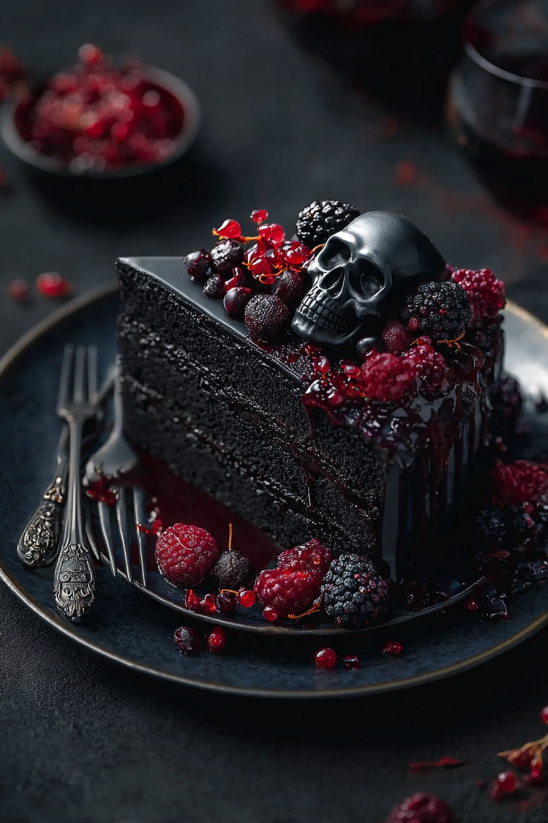
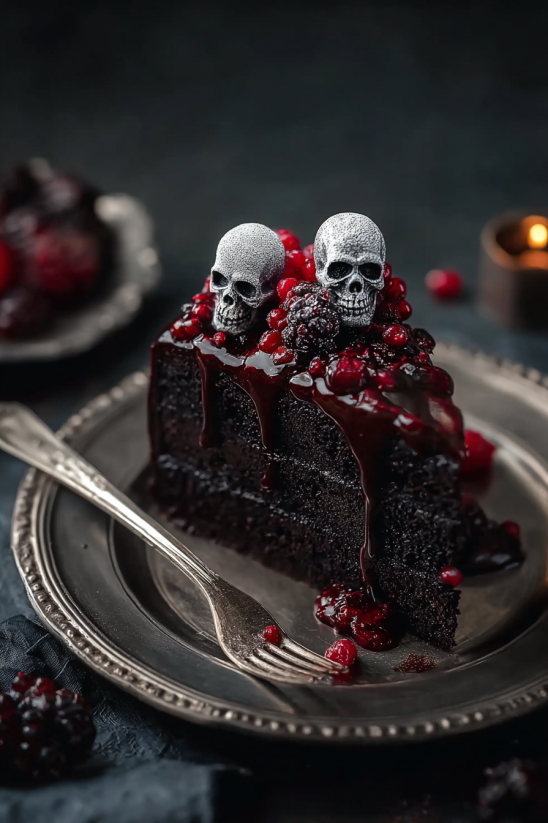
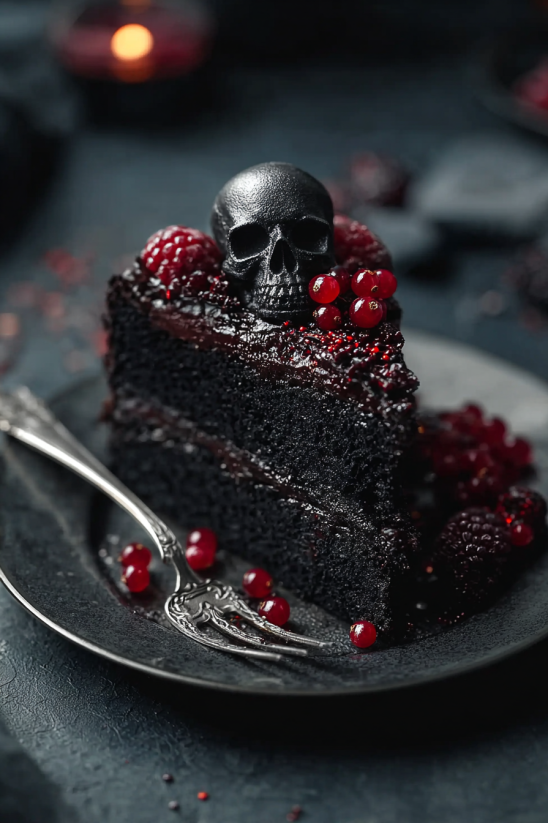
This Spooky Black Velvet Halloween Cake is the showpiece your Halloween needs. Its jet-black color and decadent chocolate flavor surprise everyone at first bite. With easy-to-find ingredients and lots of room for creative decorating, this cake brings drama and delight to any October table. It has become my family’s tradition for Halloween night and never fails to wow our friends and neighbors who drop by.
I remember the excitement the first time I revealed this at a Halloween gathering. Watching everyone marvel at the color and hearing giggles over the candy eyes made it a recipe I now look forward to every autumn.
Ingredients
- All-purpose flour: The structure for a tender even crumb Look for unbleached flour for best texture
- Granulated sugar: Sweetens and tenderizes The fine grain dissolves easily for even mixing
- Baking soda and baking powder: Both ensure a lofty and light cake Always check freshness for best rise
- Salt: Seasons and balances the sweetness Use fine sea salt for even distribution
- Unsweetened cocoa powder: Dutch processed will give the deepest color and smoothest cocoa taste
- Black gel food coloring: Creates dramatic color without thinning the batter Use a concentrated gel not liquid
- Buttermilk: Adds tang softness and moisture Use at room temperature for a smooth batter
- Vegetable oil: Keeps the cake extra tender A neutral oil works best
- Large eggs: Bind and provide structure Fresh room-temperature eggs blend better
- Vanilla extract: Adds depth and warmth Opt for real vanilla over imitation
- White vinegar: Reacts with baking soda for extra lift and a tender crumb
- Hot coffee: Intensifies the chocolate flavor and moistness Use freshly brewed for a richer result
- Cream cheese: Softened for a smooth tangy frosting Always use full-fat for creaminess
- Unsalted butter: Softened will whip fluffy with the cream cheese Choose high quality for best flavor
- Powdered sugar: Sifted for a smooth frosting No lumps
- Black gel food coloring: Optional for spooky gothic frosting A few drops go a long way
- Edible glitter or luster dust: Optional adds shimmer Look for food-grade only
- Candy eyeballs and Halloween sprinkles: Fun touch kids love
- Spider web icing and plastic spiders: Non-edible spiders are for decoration only Remind guests
Step-by-Step Instructions
- Preheat and Prepare:
- Line two round cake pans with parchment paper and grease them thoroughly to prevent sticking. Preheat the oven to 350 degrees Fahrenheit making sure the rack is in the center position.
- Mix Dry Ingredients:
- Whisk together flour sugar baking soda baking powder salt and cocoa powder in a large mixing bowl until all streaks disappear. Ensure your cocoa is evenly distributed for a black velvet crumb.
- Mix Wet Ingredients:
- In a medium bowl whisk buttermilk oil eggs vanilla extract and vinegar until fully blended and smooth. Stir in enough black gel food coloring for a glossy jet-black mixture.
- Combine with Hot Coffee:
- Pour the wet ingredients into the dry ingredients stirring gently just until combined. Slowly add hot coffee mixing until the batter is silky and slightly loose. This ensures a luscious moist cake.
- Bake the Cakes:
- Divide batter evenly between pans smoothing tops. Bake for 30 to 35 minutes checking for doneness with a toothpick. Cool in pans for 10 minutes then invert onto wire racks to cool fully.
- Prepare Cream Cheese Frosting:
- Beat softened cream cheese and butter together until light and fluffy. Gradually beat in sifted powdered sugar and add vanilla plus a touch of black gel if desired. Whip until frosting is smooth and creamy.
- Assemble the Cake:
- Level cooled cake layers with a serrated knife. Place one layer on your serving platter and cover with a thick layer of frosting. Add second layer and cover top and sides smoothly with remaining frosting using an offset spatula.
- Decorate:
- Use Halloween sprinkles candy eyes edible glitter or a piping bag for spiderwebs. Place plastic spiders for dramatic flair. Kids love helping at this stage and there are no rules.
 Save Pin
This recipe is a family favorite because of the wow factor With dark chocolate cake and creative decorating it makes everyone smile Every year my youngest asks to help scatter the candy eyeballs and we all compete to see who makes the silliest spooky face
Storage Tips
Store the frosted cake in the fridge lightly covered for up to three days. Allow slices to come to room temperature before serving for softest texture. Unfrosted cake layers can be wrapped tightly and frozen for up to two months just thaw before assembling and decorating.
Ingredient Substitutions
You can swap hot water for coffee if you prefer a caffeine-free cake. Greek yogurt thinned with milk works in place of buttermilk. For a dairy-free version use vegan butter and cream cheese in the frosting. If you run out of black food gel mix purple and blue gel colorings for a near-black shade.
Serving Suggestions
Slice thick wedges and serve on a platter decorated with extra edible glitter or luster dust for drama. Pair with hot cocoa or rich coffee for a cozy October treat. Leftovers make a perfect midnight snack on Halloween night. Try offering a garnish of berry sauce for a “bloody” effect.
Cultural and Historical Context
Velvet cakes are a Southern tradition known for their fine crumb and luxurious texture. Black velvet is a spooky twist inspired by classic red velvet cake but with richer chocolate flavor and a dramatic Halloween palette. Decorating cakes for Halloween is a beloved custom in many families marking the season with a homemade treat everyone remembers.
 Save Pin
Commonly Asked Questions
- → How do I achieve a deep black color in the cake?
Use Dutch-processed cocoa and black gel food coloring to achieve a rich, jet-black hue without thinning the batter.
- → Can I use regular food coloring?
Gel food coloring is recommended, as liquid versions might affect the batter's consistency. Gel provides intense color with minimal liquid.
- → How should I store the cake?
Unfrosted layers can be tightly wrapped and kept at room temperature for up to two days. A frosted cake should be refrigerated and brought to room temperature before serving.
- → What decorations work best for a spooky effect?
Try edible glitter, candy eyeballs, spider web piping, and Halloween sprinkles. Top with plastic spiders for visual impact (remove before eating).
- → Can I make the cake layers ahead of time?
Yes, both the cake layers and frosting can be made 1–2 days in advance. Store layers tightly wrapped to maintain moisture.
- → How do I ensure clean slices for serving?
Chill the assembled cake in the fridge for about 30 minutes before slicing. This helps the frosting set and makes for cleaner cuts.