
 Save Pin
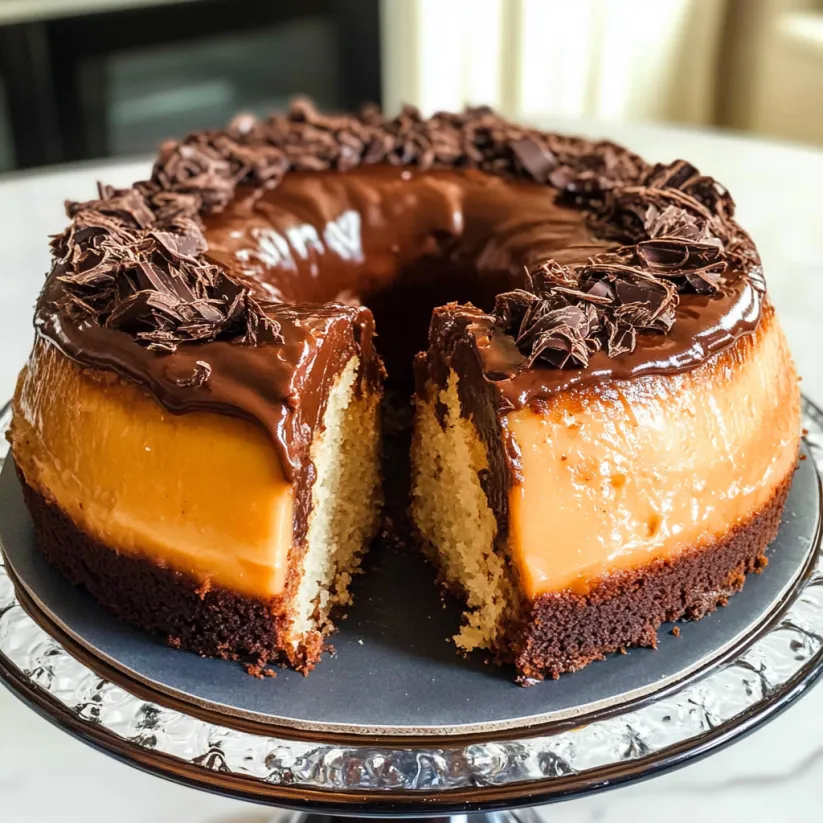
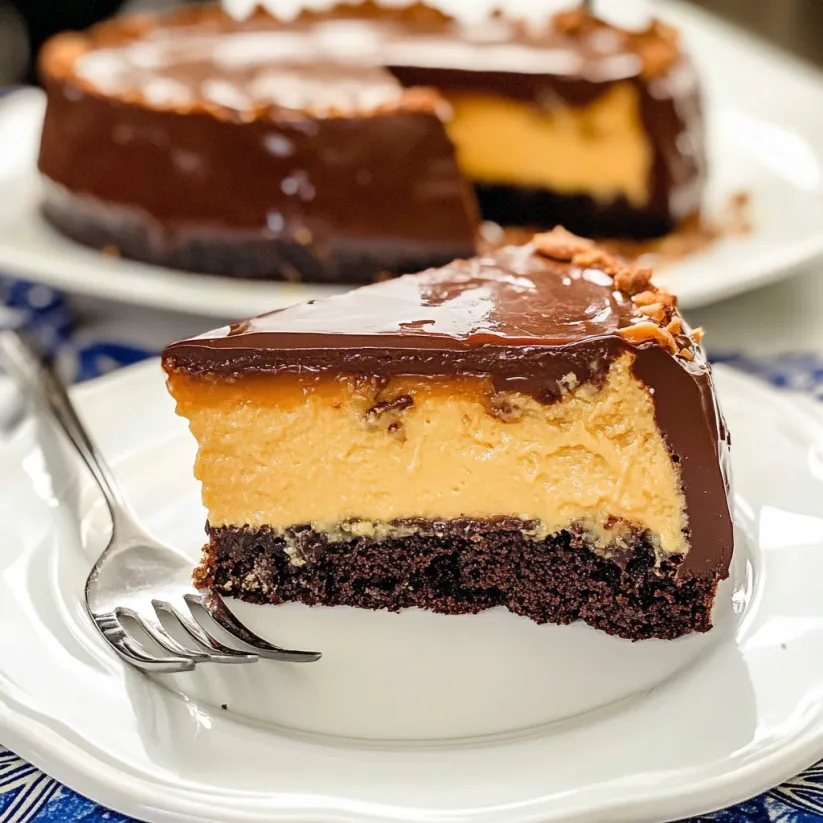
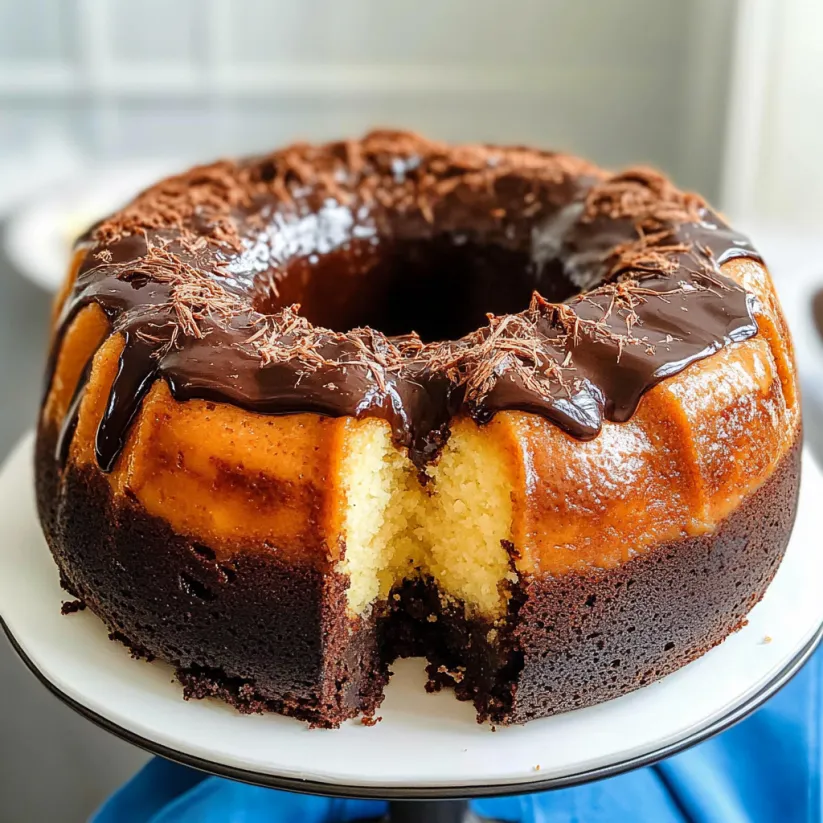
This magic flan cake transforms any gathering into a special occasion with its impressive dual layers that mysteriously switch places during baking. The rich chocolate cake rises while the creamy flan settles below, creating a stunning dessert that looks complicated but follows a straightforward process.
I first made this chocoflan for my mother's birthday after she mentioned loving it at a local Mexican restaurant. The looks of amazement when I sliced into it made all the effort worthwhile, and now it's requested at nearly every family celebration.
Ingredients
- Chocolate Cake Layer
- Caramel sauce creates that gorgeous topping when inverted
- All purpose flour provides structure without heaviness
- Cocoa powder adds deep chocolate flavor use Dutch process for more intensity
- Cinnamon introduces warmth that complements the chocolate perfectly
- Baking soda ensures proper rise while keeping the cake tender
- Salt enhances all the flavors especially the chocolate
- Bittersweet chocolate brings richness use 60 to 70 percent cacao for best results
- Unsalted butter adds moisture and flavor room temperature works best
- Buttermilk tenderizes the cake and balances sweetness
- Granulated sugar sweetens the cake while helping with structure
- Eggs bind everything together and provide lift
- Vanilla extract enhances the chocolate flavor use pure not imitation
- Flan Layer
- Sweetened condensed milk creates that classic flan sweetness and silky texture
- Whole milk lightens the mixture while maintaining creaminess
- Cream cheese adds tanginess and extra richness that traditional flans might lack
- Eggs and egg yolks provide the custard structure essential for proper setting
- Vanilla extract rounds out all the flavors use Mexican vanilla if available
Step-by-Step Instructions
- Prepare Your Equipment
- Position rack in center of oven and preheat to exactly 350°F. This temperature precision matters for the magic switch to occur properly. Prepare your bundt pan by spraying thoroughly with cooking spray, ensuring you coat every crevice. Pour caramel sauce evenly across the bottom. This will become your beautiful topping when the cake is inverted.
- Mix Chocolate Cake Batter
- Whisk together dry ingredients in a bowl until completely uniform, taking care to break up any cocoa powder lumps. Melt chocolate and butter together using 30 second microwave intervals, stirring between each until perfectly smooth and glossy. Combine wet ingredients with melted chocolate, whisking until the mixture looks silky. Fold the wet mixture into dry ingredients until just combined. Overmixing will develop too much gluten and create a tough cake.
- Layer The Components
- Pour chocolate batter evenly over the caramel in your prepared pan. The batter will be thick, so use a spatula to spread it evenly. This layer will surprisingly rise to become the top of your finished cake through kitchen magic.
- Create The Flan Mixture
- Place all flan ingredients in a blender, starting with the liquid ingredients first to prevent splashing. Blend on low speed only until ingredients are just combined, about 30 seconds. Overblending incorporates air bubbles which can affect the texture. Pour this mixture very slowly and gently over the chocolate batter. It will look like the layers are completely mixed up, but trust the process.
- Water Bath Baking
- Set your filled cake pan inside a larger roasting pan. Place the whole assembly on your oven rack, then carefully pour hot water into the roasting pan until it reaches halfway up the sides of your cake pan. This water bath ensures gentle, even cooking for the delicate flan. Bake for about 90 minutes, checking with a toothpick after 80 minutes. The toothpick should come out clean when inserted in the cake portion.
- Cooling And Serving
- Allow cake to cool in its pan for exactly 15 minutes. Place your serving platter over the pan and quickly but confidently flip everything over. The cake should release with the caramel sauce flowing down the sides. Cool completely at room temperature before refrigerating for at least 4 hours, though overnight is even better for flavors to develop.
 Save Pin
The cream cheese addition is my secret weapon in this recipe. While not traditional, it creates a richer, more velvety flan layer that impressed even my Mexican grandmother who initially questioned this modification but requested the recipe after tasting it.
Troubleshooting Common Problems
If your cake layers don't magically switch places, the most common culprit is improper oven temperature. Invest in an oven thermometer to ensure accuracy. The water bath is also crucial for the proper density changes that allow the chocolate to rise while the flan sinks.
Sometimes the cake sticks when inverting. Prevent this by being generous with your pan preparation and allowing exactly 15 minutes cooling time before inverting. Any longer and the caramel may begin to harden and stick to the pan.
The Perfect Water Bath
Creating a proper water bath is essential for flan success. Use water that is hot but not boiling. Cold water takes too long to heat in the oven and affects baking time. Make sure water reaches halfway up the pan, not higher or lower. Too little water doesn't provide enough insulation, while too much can splash into your cake.
Serving Suggestions
This chocoflan is impressive on its own, but can be elevated with a few simple additions. Offer a small pitcher of extra warm caramel sauce for guests to pour over their slices. Fresh berries provide a tart contrast to the sweet dessert, while a light dusting of cinnamon or cocoa powder over the top adds visual appeal.
For an adults only variation, add a tablespoon of coffee liqueur or Mexican chocolate liqueur to the caramel sauce before pouring into the pan. The alcohol will bake off, leaving behind complex flavor notes.
 Save Pin
Commonly Asked Questions
- → Why is it called Magic Flan Cake?
It's called 'magic' because during baking, the layers switch places! The dense chocolate batter rises to the top while the lighter flan mixture sinks to the bottom. When inverted after baking, you get a beautiful layered dessert with flan on top and chocolate cake on the bottom.
- → Do I really need a water bath for this dessert?
Yes, the water bath is essential for this dessert. It provides gentle, even heat that helps the flan set properly without curdling. The water should come halfway up the sides of your bundt pan for best results.
- → Can I make Chocoflan without cream cheese?
Yes! Traditional chocoflan doesn't include cream cheese. The recipe will still work without it, but the cream cheese makes the flan layer creamier and richer. If you omit it, you might want to adjust the other ingredients slightly.
- → How do I know when my Chocoflan is fully baked?
Insert a toothpick into the chocolate portion of the cake. If it comes out clean, your chocoflan is done. The total baking time is usually around 90 minutes, but oven temperatures vary, so start checking at the 80-minute mark.
- → How should I store leftover Chocoflan?
Store leftover chocoflan in an airtight container in the refrigerator for up to 5 days. You can also freeze it for up to a month. When ready to serve frozen chocoflan, thaw it in the refrigerator first, then let it come to room temperature before serving.
- → Can I use a different pan if I don't have a bundt pan?
An angel food cake pan works well as an alternative. The most important thing is that the pan doesn't have a removable bottom, as the caramel and flan mixture would leak out. The pan should also have about a 12-cup capacity.