
 Save Pin
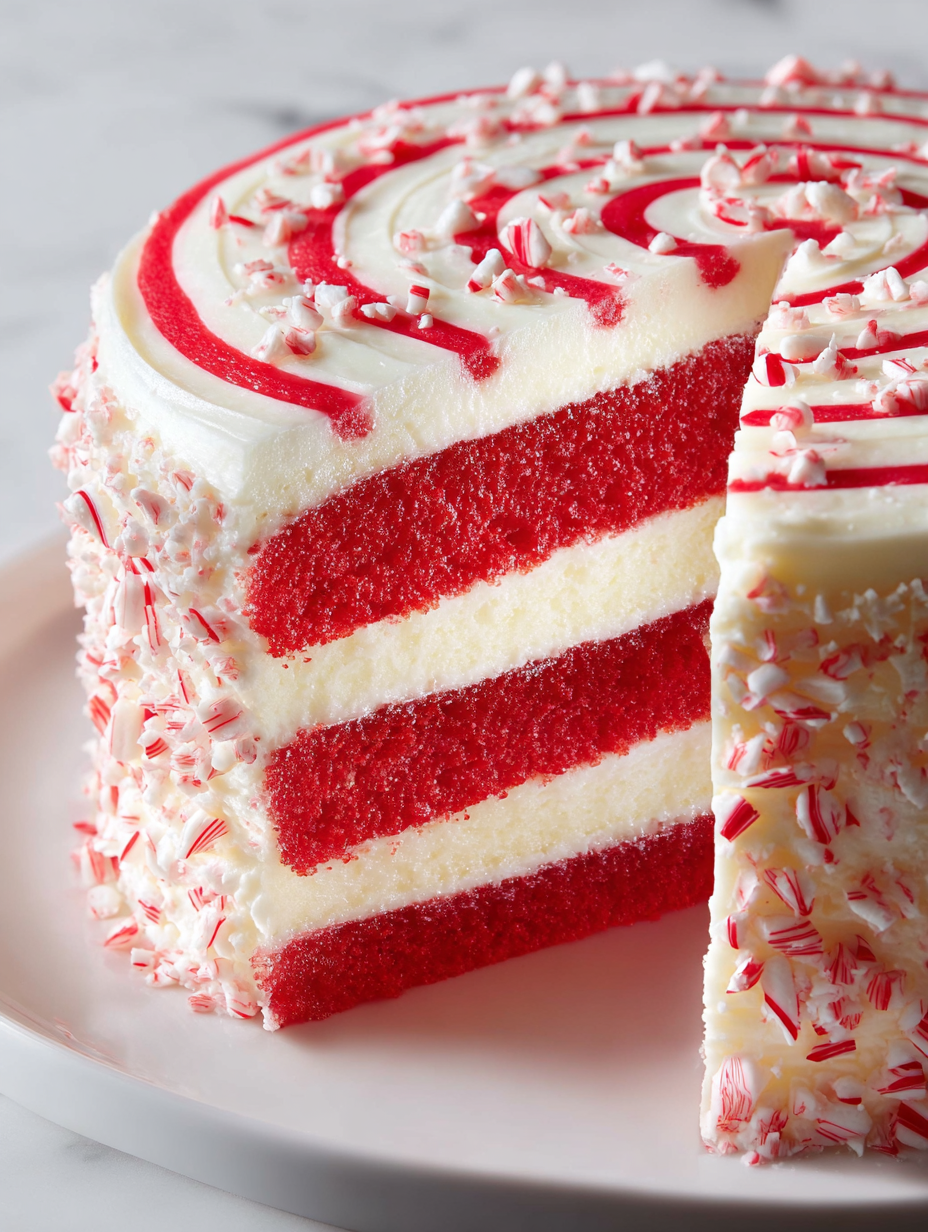
This candy cane cake is the perfect festive centerpiece for any holiday gathering. With its eye-catching red and white striped layers and a refreshing blend of vanilla and peppermint, this cake brings both visual delight and seasonal flavor to your table. Whether you want to impress guests or treat your family, this cake combines classic holiday spirit with a satisfying homemade touch. It may look complex with its eight layers, but the process is straightforward, and the end result is well worth the effort.
I first made this cake for a holiday party and everyone was amazed by how festive and flavorful it was. Now it’s my go-to dessert for winter celebrations and always gets rave reviews.
Ingredients
- Cooking spray: to grease pans and prevent sticking for perfect layers
- All-purpose flour: the base for a sturdy yet tender cake texture pick a good quality, unbleached flour
- Baking powder: helps the cake rise, making layers light and airy
- Kosher salt: enhances the sweetness and balances flavors
- Baking soda: works with acidic ingredients to ensure proper rise
- Granulated sugar: sweetens the cake use pure cane sugar for best flavor
- Unsalted butter: adds richness and moisture soften well for even mixing
- Large egg whites: provide structure and lift without heaviness make sure they are at room temperature
- Pure vanilla extract: essential for classic cake flavor choose pure extract over imitation
- Whole milk: creates a creamy batter room temperature helps with even mixing
- Red food coloring: creates the festive stripe gel colors work best for vibrant hues
- Unsalted butter (for frosting): creates a smooth, rich base for the peppermint frosting
- Confectioners’ sugar: dissolves easily for a silky frosting texture
- Peppermint extract: delivers the refreshing mint flavor that defines the cake
- Heavy cream: lightens and smooths the frosting for spreadability
- Kosher salt: balances sweetness in the frosting
- Peppermint candies: adds a festive finishing touch for decoration
Step-by-Step Instructions
- Sift and prep the dry ingredients:
- Whisk the flour, baking powder, kosher salt, and baking soda together in a large bowl. This ensures even distribution and a light cake texture.
- Cream the butter and sugar:
- In the bowl of a stand mixer fitted with the whisk attachment, beat the softened butter and granulated sugar on medium-high speed for 2 to 3 minutes until light and fluffy. This step traps air and creates the cake’s tender crumb.
- Combine egg whites and vanilla:
- Add the room temperature egg whites and vanilla extract to the butter and sugar mixture. Beat until fully combined for a smooth batter without streaks.
- Add milk and dry ingredients:
- Reduce the mixer speed and pour in the whole milk gradually, mixing to incorporate. Slowly add the dry ingredients, mixing just until combined to avoid overworking the batter.
- Divide and color the batter:
- Transfer half of the batter to another bowl. Add red food coloring drop by drop to that half until you achieve your desired shade. Leave the other half plain for the white layers.
- Prepare pans and bake layers:
- Grease and line four 8-inch round cake pans with cooking spray and parchment paper. Evenly divide the white batter between two pans and the red batter between the other two. Bake at 350 degrees Fahrenheit for 25 minutes or until a toothpick comes out clean. Cool for 15 minutes in pans before transferring to wire racks to cool completely.
- Make the peppermint frosting:
- Beat softened butter on medium-high speed for 2 minutes until fluffy. Add confectioners’ sugar, heavy cream, peppermint extract, and a pinch of salt. Beat for 5 to 6 minutes until the frosting is light and fluffy with increased volume.
- Color a portion of frosting red:
- Scoop about one and a half cups of frosting into a separate bowl. Add red food coloring slowly until you reach the vibrant red hue desired.
- Slice and layer the cake:
- Carefully slice each cake horizontally to make four thinner layers per cake, totaling eight layers. On your serving platter, start with a white layer and spread about three-quarters of a cup of white frosting evenly on top. Alternate between red and white layers, frosting each as you go.
- Apply crumb coat and chill:
- Spread one and a half cups of white frosting on the top and sides of the stacked cake to seal in crumbs. Refrigerate the cake for about 30 minutes to set this base coat.
- Pipe and smooth frosting stripes:
- Fill piping bags or plastic bags with red and white frosting. Pipe alternating stripes around the outside of the cake. Use a tall bench scraper to smooth the stripes for a clean striped finish.
- Decorate with peppermint candies:
- Top the cake with whole peppermint candies to add extra festive flair and a bit of crunch.
 Save Pin
One of my favorite things about this cake is the peppermint frosting which perfectly balances the sweetness of the cake itself. I remember making this with my family and the kids loved helping decorate with peppermint candies — it turned the whole baking day into a joyful holiday tradition.
Storage Tips
Store any leftover cake covered tightly with plastic wrap or in an airtight cake container at room temperature for up to three days. If you want to store longer, wrap the cake in plastic wrap and foil and freeze for up to three months. Thaw overnight in the refrigerator before serving for best texture.
Ingredient Substitutions
You can substitute whole milk with buttermilk for a tangier flavor and even more tender crumb. Just reduce baking soda slightly if you do this. For those avoiding dairy, use non-dairy milk like oat or almond but note it might slightly change texture. Peppermint extract can be swapped for vanilla or almond extract if peppermint flavor is not preferred.
Serving Suggestions
This cake pairs beautifully with simple whipped cream or a scoop of vanilla ice cream to balance out its rich layers. Garnish plates with crushed peppermint candies or fresh mint leaves for an extra festive touch. It also goes well with a hot cup of dark coffee or rich hot chocolate on chilly winter evenings.
Cultural Context
Candy canes have been a holiday staple since the late 19th century, symbolizing festive cheer and often associated with Christmas traditions. This cake borrows their iconic red and white striped look while incorporating classic winter flavors like peppermint, creating a dessert that is both nostalgic and celebratory in spirit.
Pro Tips
Make sure to soften your butter well for both cake and frosting so mixing is smooth and no lumps remain I learned the hard way to slice cake layers with a serrated knife very carefully to keep edges even and clean for beautiful layering Do not rush coloring the batter or frosting gradual addition of food coloring helps avoid over-saturation or altering the cake's texture
Commonly Asked Questions
- → How do you achieve the red and white stripe effect?
The batter is divided and tinted with red food coloring for half, while the other half remains plain. After baking, each layer is sliced horizontally to create multiple red and white layers, which are then stacked alternately with frosting.
- → What is the role of peppermint in the cake?
Peppermint extract is added to the frosting, infusing a cool, refreshing flavor that complements the vanilla cake layers, enhancing the overall festive taste.
- → How can one decorate the cake with peppermint candies?
After piping red and white frosting stripes around the cake, peppermint candies can be placed on top to add texture and a decorative festive touch.
- → Is it necessary to use all egg whites instead of whole eggs?
Using egg whites helps achieve a lighter texture in the cake layers, contributing to a delicate and moist crumb that pairs well with the peppermint flavor.
- → What tips help prevent cake layers from sticking to the pans?
Grease the pans with cooking spray and line them with parchment paper before pouring in the batter. This ensures easy removal and maintains the layer’s shape.